Here is a special service for you if you need to print a lot of parts, be independent in the design phase and save money!
Index
1. What is the 3D Build service?
3. How to create your 3D Build
4. Recommended software to nest your 3D Build
What is the 3D Build service?
The 3D Build service allows you to print a whole Build Unit with our HP MJF 5210Pro printers.
The 3D Build service is mainly addressed to other 3D Printing Services or large companies, who want to produce a large quantity of the same or different products or who need to cover a momentary or constant surplus of work or downtime.
In this way, the customer has access to an exclusive technology, being able to take advantage of the full or partial capacity of the HP MJF 5210Pro machines at fixed prices and competitive in the industry, paying according to actual print volume, density and height.
In order to purchase this service, the customer is responsible for nesting the parts on his own. This operation justifies the competitive and fixed cost of the Build, for which no control is performed by our technicians.
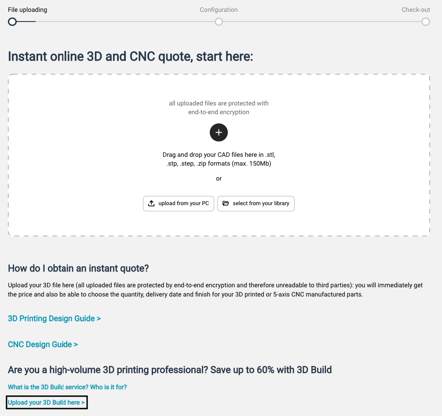
How do I order a 3D Build?
To order a 3D Build unit, just follow a few simple steps and you will be able to print all your parts with just one click!
Enter the section and then start the order process.
From this page you can complete the operation by uploading a .Magics or .STL file (or a .zip file containing .STL files already placed in the space) - Maximum size 500Mb
Then proceed to configure your Build, choosing the different features:
- Materials: Nylon PA12, Nylon PA11, Nylon PA12 GB, Nylon PA12 W
- Finishes: With powder, Raw Grey, Top Black™
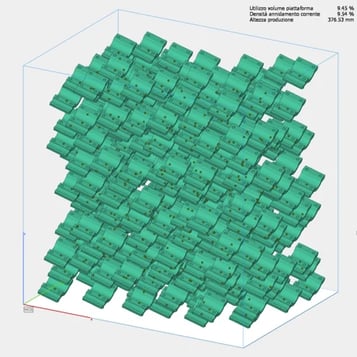
- Printing Density (%): during nesting, your programme will provide you with information about the filling density of your Build.
The density is the ratio between the actual volume of material to be printed and the volume of the printing area, expressed as a percentage.
Please note that the maximum density allowed for correct printing is 11%. - Height (mm): the height can vary from 1mm to 380mm.
- Build Quantity: choose the quantity in the Quotation Tool. You will be offered a shipping date with the price per Build unit.

How to create your 3D Build
In order to achieve an optimal result in terms of tolerances and repeatability, Weerg suggests that the following rules should always be observed when nesting.
Here are some tips suggested both by the manufacturer HP itself and by our many years of experience in using these machines.
1) Maximum printing area dimensions are:
- 380x284x380mm (X, Y, Z)
2) Some tips on how to distance the parts uploaded in the Build (on all X, Y, Z axes):
- Parts above 100cm³: distance at least 10mm
- Parts smaller than 100cm³: distance at least 5mm
- Parts with a density greater than 25%: distance at least 10mm
- Very voluminous and massive parts close to large, flat surfaces can affect the flatness of adjacent parts: we suggest increasing their distances
- We suggest emptying bodies thicker than 10mm: this will improve performance and reduce the possibility of defects and/or imperfections
- All parts: distance at least 10mm from the outer edges
The actual dimensions of the printing plate will then be 360x260mm.
4) Density
- From 1% to 11% max (we suggest from 5% to 8%)
❗Density is the ratio between the actual volume of material to be printed and the volume of the printing area, expressed as a percentage.
5) The placement of parts within the area can also determine correct printing or, alternatively, aesthetic defects. Here are some tips on part orientation (X and Y axes only):
- In order to achieve better tolerances and surfaces, it is recommended to incline flat surfaces perpendicular to Z by 20° in X and/or 20° in Y, where possible, especially those oriented in the Z+ direction.
This will limit as much as possible the "layer" effect given by the printing layers, as well as improving the mechanical features of the part and improving the finish and tolerance of all walls that would have been parallel to Z.
This method is suggested in particular to ensure eccentricity of constant circumferences such as holes, pins or pipes in general. - Align the 'face' of the aesthetic part in the Z-direction (i.e. so that it faces the printing plate).
- Do not align flat surfaces at an angle of less than 15° to the XY plate to avoid finishing effects that are unpleasant to the touch. Instead, we recommend orienting these parts flat.
- Parts with large, thin and extended surfaces will always be at warpage risk, a printing phenomenon that we cannot predict or guarantee. To limit this phenomenon, we suggest you to read Chapter 10 of our 3D Printing Guidelines.
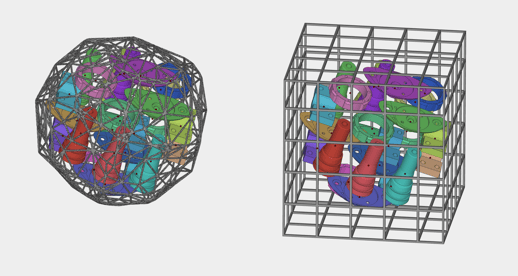
6) If you need to print a lot of small parts, we recommend that you create containment cages as in the image below. This will help your small parts not to break or get lost during production.
- All parts smaller than 1cm³ or with 2 or more sides smaller than 10mm should be placed in containment cages. These must be dimensioned to contain the parts so that they are not lost or misplaced during cleaning operations.
Regarding the design of individual files, please refer to our dedicated page:
Recommended software to nest your 3D Build
Although there are many software packages with which manual nesting can be performed (e.g. one could use any 3D CAD software), we generally do not recommend them because the optimization is too complex to be performed correctly and without errors by hand.
This is why we recommend the following automatic software:
Responsibility
We exclude all responsibility for the success or failure of the printed material if it does not comply with the above rules.
We will not carry out a preprinting check to verify whether or not the Nesting and Design rules of the individual parts have been complied with.
❗Weerg, in the event of non-compliance, will not accept liability for:
- Breakages on thin walls of less than 1 mm;
- Deformation/ warpage;
- Elephant phenomenon;
- Design and nesting errors;
- Orientation errors;
- Part spacing.
The company will assume responsibility for any layering defects, printing faults attributable to the printer, out-of-tolerance cases and finishes not corresponding to those selected at the time of purchase.